
Facebook How-To’s For Senior Netizens
 Statistics show that about four (4%) percent of the 60-year old and above Filipino citizens are regularly going online and more than 90% of them use Facebook (FB) for social networking. They are the so-called Senior Netizens (SN) and more often not, their FB accounts were created for them by their children and in some cases by their grandchildren. After a few training sessions on how to login, invite “friends” (enclosed in quotation marks because not all are real-life friends), make a post, “Like” (have quotation marks because clicking the button may mean “noted” and not necessarily agreeing with the comment or post) and/or comment on a “friend’s” post, the SN will be left on his own using his FB account in its default settings.
There is nothing very wrong in using an FB account with default settings except that there will be some nuisances as follows:
1) His Timeline will have posts about status updates of his “friends” instead of only his own posts because it is intended to be his online diary.
2) Another nuisance is his News Feed will be flooded with updates and shared posts of “friends” which are mostly not interesting to him.
3) His email’s inbox will be spammed with notifications about Posts on his Timeline, Photos he’s tagged in, Comments on his photos, Upcoming birthdays, Friend confirmations, Likes on his posts, Posts from Close Friends and many other annoying messages.
The above-mentioned nuisances are easy to avoid or remove if an FB user knows how to change his account settings. An SN can seek the help of the one who set-up his account to do the changes but if it happens that time or something else prevent him from getting the help, below are the procedures on how to eliminate the three (3) nuisances mentioned above. Again, I wish to repeat that these how-to’s may be too simple for some FB users so I wish to emphasize that the intended beneficiaries are the SNs who are not yet equipped with the knowledge on how to change the settings of their FB accounts.
A usual way of giving the step-by-step procedure to follow is using “keyword” (term or word to look for and/or click in a webpage) and “double right-arrow” (>>) to mean ‘proceed to look for the next keyword in the webpage that will open’. For example, to Change Your Name at Facebook . . . the procedure will be Settings >> General – Name – “Edit” >> Name – First – Last – “Review Change” which means:
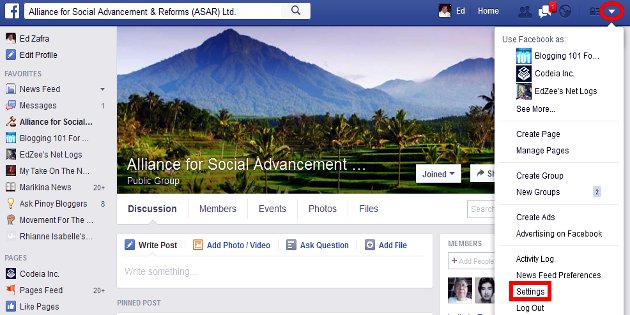
Step 1) Look for Settings link (see image on top and the procedure in the next paragraph) then click it to open another webpage.
Step 2) In the webpage for General settings, look for Name then click “Edit” opposite it.
Step 3) On the new page that will open edit your First Name and Last Name then click “Review Change.”
Now, let’s go to the procedure to eliminate the 3 nuisances I described above but first, let me tell you where to locate the “Settings” button or link where the procedures will begin. It is shown in the image above. You have to click the Down Arrow (marked with red oval) for the pop-up with the Settings link (marked with red rectangle) to show.
To avoid the posts of your “friends” from getting posted on your Timeline without your permission, follow this procedure . . . Settings >> Timeline and Tagging >> Who can add things to my Timeline >> Edit – Who can post to my Timeline – Only Me. There are many more self-explanatory items on Timeline and Tagging Settings page that can be set for more protection of your privacy.
In order to avoid the many activities of your Facebook account from getting into your email inbox and save your time spent in deleting those FB notifications, follow this procedure . . . Settings >> Notifications >> Email – Edit >> WHAT YOU’LL RECEIVE >> Choose “Only notifications about your account, security and privacy.” I suggest that you do not “Turn On” any item in the long list of NOTIFICATIONS YOU’VE TURNED OFF unless you want some of them in your email inbox.
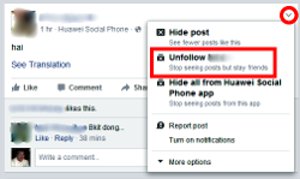 The prevention of your “friends’” annoying updates and shared posts from appearing is very easy to do. You don’t need to go through the Settings and look for links in order to avoid seeing those unwanted items in your News Feed. All you have to do is click the Down Arrow (marked with red circle in the image at left) and choose “Unfollow ________” in the pop-up that will appear. Take note that you will stop seeing posts from “__________” but you remain friends.
I hope that my intended audience for this blog will find the above FB how-to’s easy to follow. You may post your queries about them by way of a comment below. Also, should you need assistance for other settings in your FB account, just let me know and I will do my best to post the how-to’s for your needs.


Latest Feedbacks